Sciatica Relief
Sciatica Relief
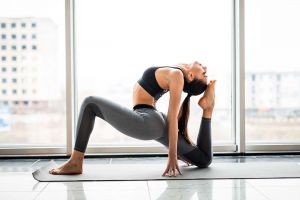
10 Yoga Poses to Soothe Your Sciatica
The sciatic nerve originates in the lower back and travels deep into the buttocks, thighs, and down the sides of the legs. Compression, inflammation, or damage to the sciatic nerve or lower vertebrae causes sciatica. Sciatica can also be caused by tight, overused, or damaged muscles.
Sciatica pain is characterised by a sharp, throbbing, or burning sensation that travels down your leg. Numbness, tingling, and inflammation may also be present. Sciatica usually affects only one side of the body.
Sciatica can be a small annoyance that causes moderate discomfort, but it can also cause severe pain.
Yoga positions including Cobra and Locust Pose were proven to help with sciatica pain in a small 2013 study. According to 2017 research, yoga has the power to:
- Lower back pain that is chronic
- Improve activity limits
- Reduce your use of pain relievers.
Let’s look more closely at how you can use yoga’s therapeutic applications to prevent, relieve, and repair sciatica.
Legs-Up-the-Wall pose (Viparita Karani)
This is the ultimate restorative pose, letting your body relax, recuperate, and rest.
Place a pillow or bolster beneath your hips for added support.
Sit against the wall on your right side.
Lie down on your back and swing your legs up the wall, bringing your hips as near to the wall as possible.
Underneath your head, place a pillow or folded blanket.
Make any comfortable position with your arms.
Allow your body to become heavy as you rest totally.
Hold this position for up to 20 minutes.
Half Lord of the Fishes Pose (Ardha Matsyendrasana)
This twist lengthens and expands your spine, which relieves pain and tension. Starting in your lower back, feel the twist’s movement.
Begin by sitting in a comfortable position. With your knee pointed forward or to the side, bring your right foot to the outside of your left hip.
Your left foot should now be on the outside of your right thigh.
Bring your left hand behind you to the floor, keeping your fingertips supported.
Bring your right arm to the outside of your left thigh or wrap it around it.
Lift and stretch your spine with each breath.
Twist a little further with each breath to go deeper into the posture.
You can see in any direction by turning your head.
Hold the position for up to 1 minute.
Rep the process on the other side.
Bridge Pose (Setu Bandha Sarvangasana)
The spine is stretched in Bridge Pose, which relieves pain and tension. It stimulates circulation by gently stimulating the body. It also strengthens your legs, glutes, and core.

Lie down on your back, knees bent and heels pressed against your hips.
With your hands facing down, bring your arms alongside your body.
Raise your hips as high as possible while slowly lifting your spine from the floor.
Maintain alignment by placing a block between your knees or thighs.
Slowly return to your original position.
Rep this movement ten times more.
In the starting position, relax your body.
Hold the pose for 1 minute in the top position.
Reclined Pigeon Pose
(Supta Kapotasana)
On your back, Pigeon Pose supports your lower back and relieves pressure on your hips. The piriformis muscle, as well as your glutes and hips, are stretched in Reclined Pigeon Pose.
Lie down on your back, knees bent and heels pressed against your hips.
Bring your right ankle to the bottom of your left thigh by bending your right knee.
If you’re already feeling stretched, stay here.
Lift your left foot and draw your left knee in toward your chest to go deeper.
To hold behind your left thigh or shin, interlace your fingers.
Hold the position for up to 1 minute.
Rep the process on the other side.
Knees-to-Chest Pose/Wind-Relieving Pose
(Pawanmuktasana)
This is a great pose for releasing tension in the lower back, hips, and glutes.
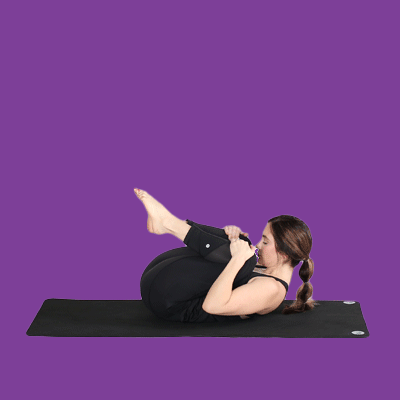
Do one leg at a time to feel the posture less intensely.
Draw both knees in toward your chest while lying on your back.
As you stretch your hands around the backs of your thighs or around your shins, draw your ankles and knees together.
If your hands are long enough, interlace your fingers or grab opposite elbows.
Lift your head and tuck your chin into your chest to intensify the stretch.
Maintain this position for up to one minute.
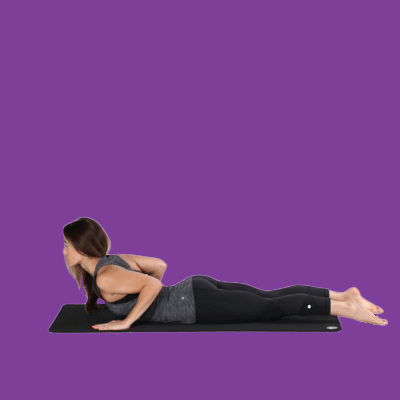
Locust Pose (Salabhasana)
The spine, glutes, and thighs are all strengthened in this pose. It supports your lower back and core. It also helps to improve hip circulation and flexibility.
On your stomach, interlace your fingers at the base of your spine.
Slowly raise your torso, head, and arms to the highest point possible.
Raise your arms above your head and away from your body.
Raise both legs at once or one leg at a time to get deeper.
Make use of your glutes, lower back, and abs.
Hold the position for up to 30 seconds.
Return to the starting position after releasing the pose.
For a few breaths, rest and relax your body while gently swaying your hips from side to side.
Rep 1–2 times more.
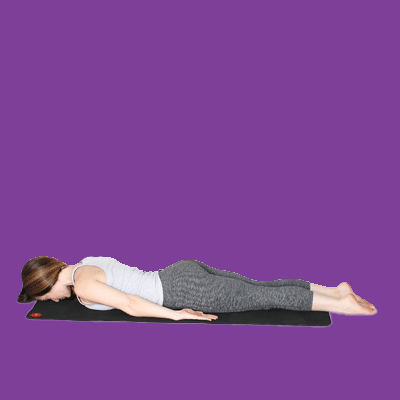
Cobra Pose (Bhujangasana)
This relaxing pose strengthens and extends your spine while also increasing circulation and flexibility.
Place your hands beneath your shoulders and lie on your stomach.
Squeeze your elbows tightly against your body.
Lift your head, chest, and shoulders by inhaling.
Maintain an open chest and a small bend in your elbows.
Thighs, lower back, and abdominals should all be engaged.
Hold the position for up to 30 seconds.
Repeat 1–3 times after releasing the posture.
Half Moon Pose (Ardha Chandrasana)
Half Moon Pose helps to strengthen, balance, and stabilise your body. It stretches your spine, glutes, and thighs while increasing flexibility and relieving tension.
Do this stance against a wall to keep yourself supported. A brick can be placed under your hand.
With your right foot in front, begin in a standing stance like Triangle.
Bend your right knee slightly more and place your weight on your right foot.
Grasp your left hip with your left hand.
As you stretch your right hand to the floor in front of and to the right of your right foot, slide your left foot forward a few inches.
Raise your left leg parallel to the ground and press out through your left heel.
As you stare forward, rotate your torso and hips open.
Lift your left hand toward the ceiling and turn your eyes upward to go deeper.
Maintain this position for up to one minute.
Return to the beginning position by bending your right leg and lowering your left leg to the floor slowly.
Rep the process on the other side.
Downward-Facing Dog
This forward bend helps to correct your body and relieve pain and tension. Downward-Facing Dog strengthens your entire body while also assisting with the correction of imbalances.
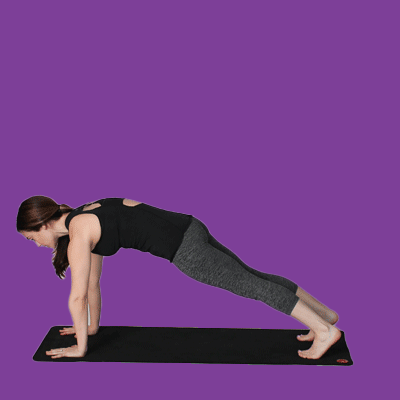
Begin by getting down on your hands and knees. As you elevate your hips toward the ceiling, press against your hands.
Bring your ears in line with your upper arms or your chin all the way in toward your chest by lowering your head.
Tilt your pelvis forward by bending your knees.
Move your body intuitively through any variations that feel suitable.
Maintain this position for up to one minute.
Child’s Pose (Balasana)
Child’s Pose is a wonderful method to connect with your body and calm it. It promotes flexibility and openness in your hips, thighs, and lower back by lengthening and stretching your spine.
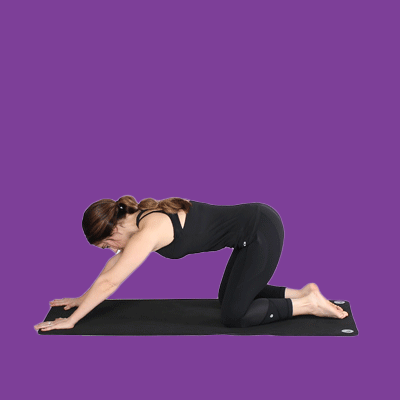
Place a pillow or bolster under your thighs, chest, and forehead for more support.
Begin by getting down on your hands and knees. Sink your hips back into your heels and bring your knees together.
Allow your arms to rest alongside your body or extend in front of you.
Allow your torso to completely relax as you sink into your thighs.
To relax any areas of tightness or feeling, concentrate on deepening your breath.
This stance can be held for up to 5 minutes.
YOGA TO AVOID WITH SCIATICA
When you have sciatica, you should avoid some yoga poses since they can aggravate your symptoms. Listen to your body and honour what it’s telling you without forcing yourself into any awkward positions.
Experiment with different approaches to determine what works best for you on any particular day. Any stance that causes pain should be avoided.
Forward bends in the seated and standing positions (except Downward-Facing Dog) should be avoided since they put additional strain on the pelvic and lower back. Forward bends can be done while lying down (lying down, face-up). This aids with hip and lower back support.
Because sciatica usually only affects one leg, you may only be able to perform certain poses on one side of your body. That’s OK. In any pose, you can bend your knees. In any sat position that causes discomfort, place cushions under your knees.
Avoid yoga poses that compress or strain your stomach if you have sciatica during pregnancy. Strong backbends, twists, and positions that exert strain on your stomach should be avoided. As needed, adjust positions with bolsters and cushions.
Outlook
The poses above may help you feel better if you have sciatica discomfort. Above all, practise ease, gentleness, and safety.
Attend a yoga class or book a private yoga session if you can. At least once a month, consult with a specialist to ensure you’re on the right course. You can talk to your yoga teacher before or after class even if you don’t have a private session.
If you have sciatica pain that lasts more than a month, is severe, or is accompanied by any odd symptoms, see a doctor or physical therapist.
Did you know that Infrared Sauna therapy relieves Sciatica pain?